<aside> <img src="https://pbs.twimg.com/profile_images/1469386518624190465/Y2esUYsl_400x400.jpg" alt="https://pbs.twimg.com/profile_images/1469386518624190465/Y2esUYsl_400x400.jpg" width="40px" /> Robin Vanina 💡 #UnrealTips @RobinVanina: With Unreal Engine 5 the new Enhanced Input System left the experimental state. And with 5.1 the old Axis and Actions mappings became deprecated.
An Enhanced Input System getting started guide 👇🔥
#UnrealEngine #gameDev #indieDev
https://pbs.twimg.com/media/FwFmnniWAAAZdiq.jpg
</aside>
<aside> <img src="https://pbs.twimg.com/profile_images/1469386518624190465/Y2esUYsl_400x400.jpg" alt="https://pbs.twimg.com/profile_images/1469386518624190465/Y2esUYsl_400x400.jpg" width="40px" /> Robin Vanina 💡 #UnrealTips @RobinVanina: The Enhanced Input System works also based on actions and axis mappings, similar to the old solution.
But it offers more possibilities when it comes to detecting and handling input. It's also making runtime control remapping easier.
</aside>
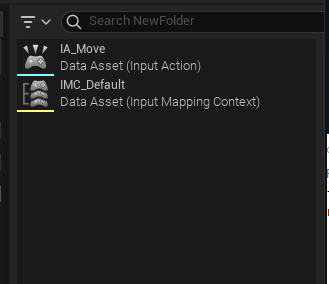
<aside> <img src="https://pbs.twimg.com/profile_images/1469386518624190465/Y2esUYsl_400x400.jpg" alt="https://pbs.twimg.com/profile_images/1469386518624190465/Y2esUYsl_400x400.jpg" width="40px" /> Robin Vanina 💡 #UnrealTips @RobinVanina: To get started, you have to create an [ Input Mapping Context ] asset as well as an [ Input Action ] asset, one for each input action (or axis).
You can find both asset types when doing a right click in the content browser and going to "Input".
https://pbs.twimg.com/media/FwFmoHPWwAAEAPK.png
</aside>
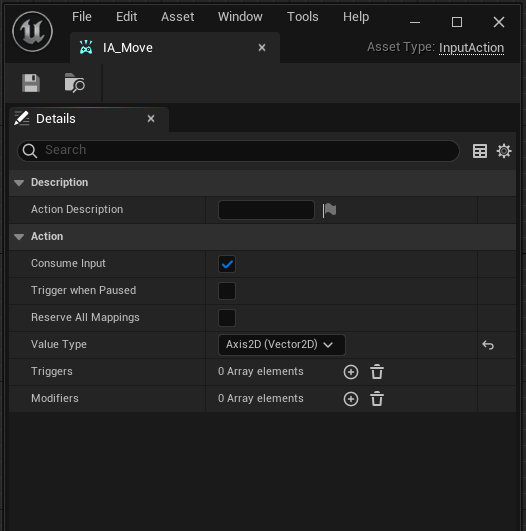
<aside> <img src="https://pbs.twimg.com/profile_images/1469386518624190465/Y2esUYsl_400x400.jpg" alt="https://pbs.twimg.com/profile_images/1469386518624190465/Y2esUYsl_400x400.jpg" width="40px" /> Robin Vanina 💡 #UnrealTips @RobinVanina: Next let's setup the first Input Action. In this example it's for moving a character.
The most important thing to change here is the Value Type. This determines what this action actually does. While a jump action is just a simple bool, a move action can be a 2d axis.
https://pbs.twimg.com/media/FwFmocGXgAEy5Xp.png
</aside>
<aside> <img src="https://pbs.twimg.com/profile_images/1469386518624190465/Y2esUYsl_400x400.jpg" alt="https://pbs.twimg.com/profile_images/1469386518624190465/Y2esUYsl_400x400.jpg" width="40px" /> Robin Vanina 💡 #UnrealTips @RobinVanina: Next, we have to continue the setup in the Input Mapping Context.
In here, add a mappings entry and select the Input Action we were creating before. Then add all the inputs you want to be assigned to this action.
Now we have to map these inputs to the correct axis values.
https://pbs.twimg.com/media/FwFmovxXgAAQrut.jpg
</aside>
<aside> <img src="https://pbs.twimg.com/profile_images/1469386518624190465/Y2esUYsl_400x400.jpg" alt="https://pbs.twimg.com/profile_images/1469386518624190465/Y2esUYsl_400x400.jpg" width="40px" /> Robin Vanina 💡 #UnrealTips @RobinVanina: Our move action has 2 axis: forward + sideways
The X-Axis maps directly, so the input for the right direction is fine by default.
The left input goes the other direction and therefore needs a "Negate" modifier. This way its value is inverted compared to the right direction.
</aside>
<aside> <img src="https://pbs.twimg.com/profile_images/1469386518624190465/Y2esUYsl_400x400.jpg" alt="https://pbs.twimg.com/profile_images/1469386518624190465/Y2esUYsl_400x400.jpg" width="40px" /> Robin Vanina 💡 #UnrealTips @RobinVanina: To map forward and backwards to the Y-Axis, we simply have to add the "Swizzle Input Axis Values" modifier. This remaps their values to the correct axis.
And don't forget a "Negate" modifier for the backwards input 👌
</aside>
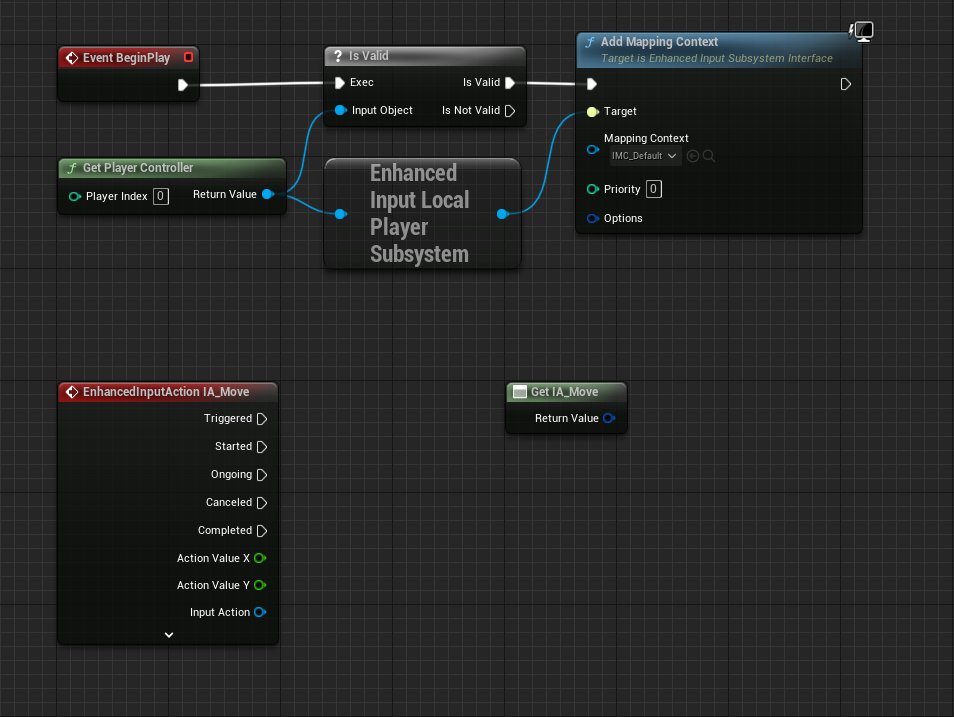
<aside> <img src="https://pbs.twimg.com/profile_images/1469386518624190465/Y2esUYsl_400x400.jpg" alt="https://pbs.twimg.com/profile_images/1469386518624190465/Y2esUYsl_400x400.jpg" width="40px" /> Robin Vanina 💡 #UnrealTips @RobinVanina: Now in your blueprints, use the "Add Mapping Context" node (as shown below) to setup our input mapping and make it usable.
From there you can use any Input Action Nodes to receive your players input.
And the small input axis node also allows to read the input whenever needed.
https://pbs.twimg.com/media/FwFmpUBWYAQ2nJc.jpg
</aside>
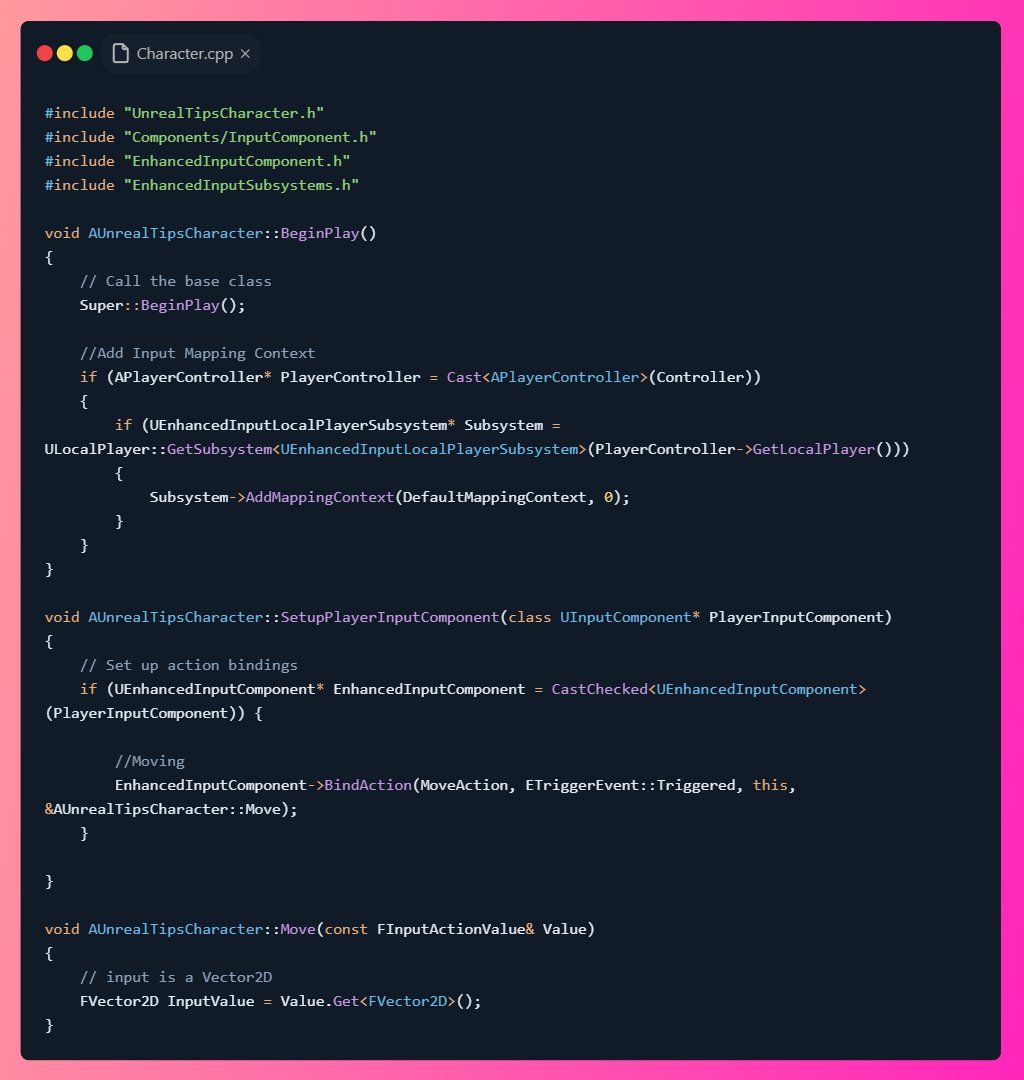
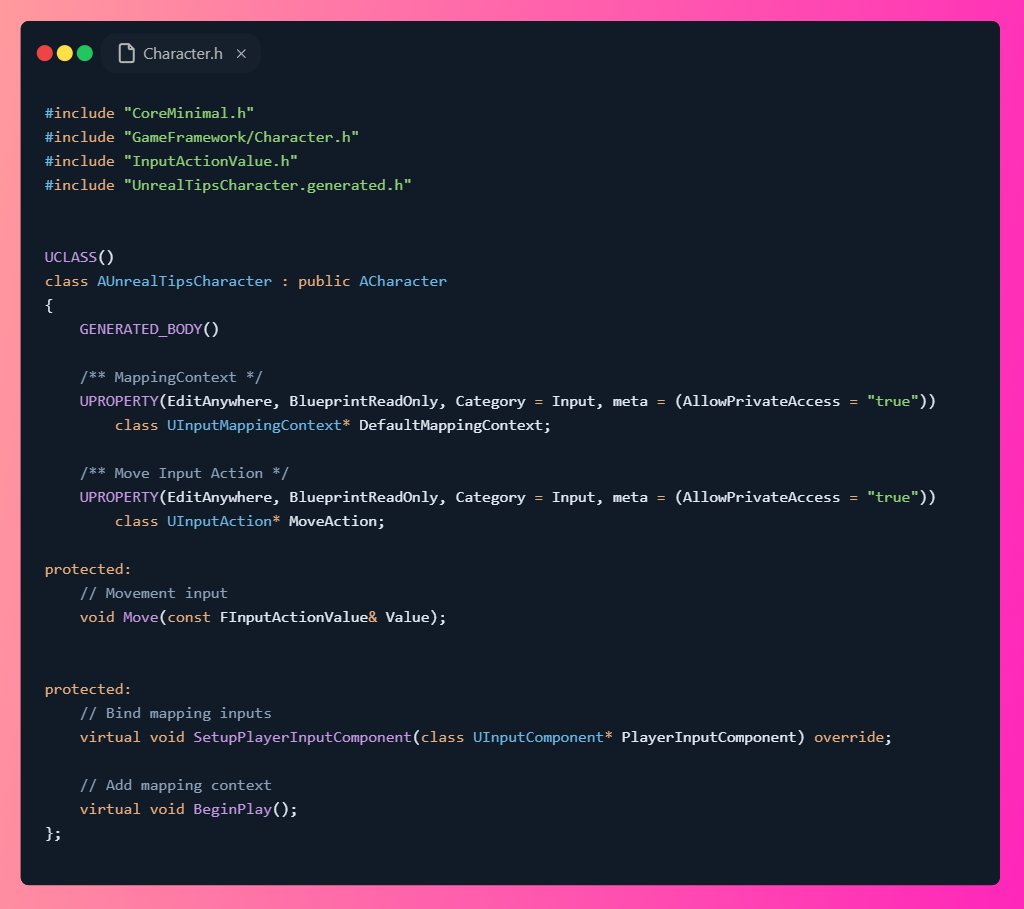
<aside> <img src="https://pbs.twimg.com/profile_images/1469386518624190465/Y2esUYsl_400x400.jpg" alt="https://pbs.twimg.com/profile_images/1469386518624190465/Y2esUYsl_400x400.jpg" width="40px" /> Robin Vanina 💡 #UnrealTips @RobinVanina: Pretty much the same for C++ First we have to add the Mapping Context on beginPlay.
Then we can listen for inputs by binding a function to our InputAction in SetupPlayerInputComponent.
And once a key is pressed, our Move function is called and we can use the Axis Values 🔥
https://pbs.twimg.com/media/FwFmpp9XsAMofv1.jpg
https://pbs.twimg.com/media/FwFmpsNXwAMpLFF.jpg
</aside>
<aside> <img src="https://pbs.twimg.com/profile_images/1469386518624190465/Y2esUYsl_400x400.jpg" alt="https://pbs.twimg.com/profile_images/1469386518624190465/Y2esUYsl_400x400.jpg" width="40px" /> Robin Vanina 💡 #UnrealTips @RobinVanina: If you like, follow me @RobinVanina for more of these threads as well as #UnrealTips to improve your workflow
Also make sure to click the first tweet below and RT it to share this little thread with other devs 🔥
<aside> <img src="https://pbs.twimg.com/profile_images/1469386518624190465/Y2esUYsl_400x400.jpg" alt="https://pbs.twimg.com/profile_images/1469386518624190465/Y2esUYsl_400x400.jpg" width="40px" /> Robin Vanina 💡 #UnrealTips @RobinVanina: With Unreal Engine 5 the new Enhanced Input System left the experimental state. And with 5.1 the old Axis and Actions mappings became deprecated.
An Enhanced Input System getting started guide 👇🔥
#UnrealEngine #gameDev #indieDev
https://pbs.twimg.com/media/FwFmnniWAAAZdiq.jpg
</aside>
</aside>